Storing Your Fabric Bundles

Standard

This week I have been up in my loft room which is supposed to be my little craft room and hideaway. It has been somewhat neglected and filled with things that aren’t really very useful and my craft stash has literally been stashed into corners, drawers and bags. I decided to deal with my bin bag of fabric scraps, fat quarters and other random bits that had become out of control.

I am really pleased with what I came up with. I used the following boxes that were up in my loft:

One collapsible crate
Two boxes with lids, one larger than the other. (Mine are pretty boxes but regular shoeboxes would work so long as they have a seperate lid)
Small plasitc containers for buttons etc.
One extra plastic tub box

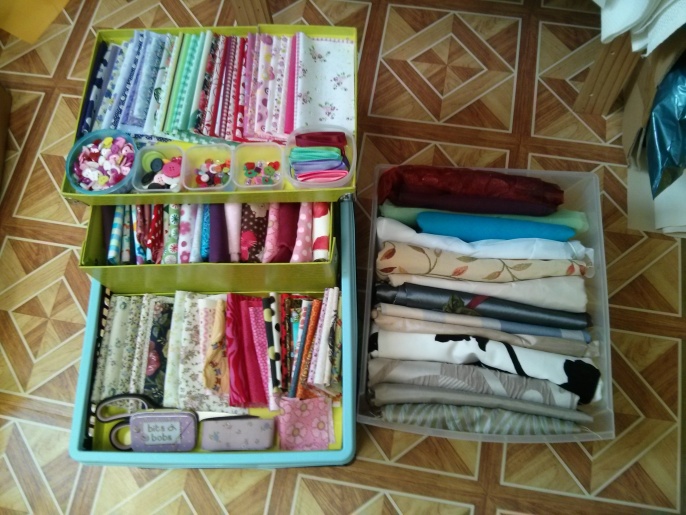
And here is how it looks:
IMG_20131209_125117

The larger pieces of fabric were folded to fit into the extra tub box standing up, ensuring that they fit into the width of the box, and that there was one folded edge showing. (Imagine stacking your CDs with the spines showing.)

The larger of the two shoeboxes I placed inside the collapsible crate. This particular box is not necessary for the project but can help to divide the fabrics if you have a lot to store. I filled the box with medium sized pieces of fabric and then put remaining larger pieces around this box to fill the collapsible crate.

The fat quarters were then folded and packed in the same way into the smaller shoebox which sits neatly inside the collapsible crate to a depth of around 3 inches.

Then I had to deal with the patchwork squares and other small scraps. The box lids come into play at this point. The larger of the two lids sits horizontally across the top of the smaller shoebox, or across the front of the collapsible crate when I fold it away.

Each patchwork square was folded in half. Starting at the left hand side of the lid I laid the first piece down with the folded edge to the left. Each piece was then laid on top of the last leaving the fold of the previous piece showing. This way you can easily pick out the pieces you want. I went to the extent of putting colours together for extra effect but it took a while. Repeat this process for the second lid, as it’s a smaller lid this fits neatly inside the collapsible crate next to the smaller shoebox, it can be lifted out easily to access the fabric underneath. I put all the bits of ribbon, buttons or other small bits in small plastic tubs and laid them along the edge of the box lids.

It took about an hour to go through my entire stash but it was worth it. What I love about the end result is that I can see each and every piece of fabric so I can find what I want really easily. It’s really versatile, you can move the lids around and stack the boxes in different ways, it’s a little like one of those boxes that opens out but without the price-tag. I didn’t realise just how much fabric I really had, lots of ideas came to mind when looking through it expect to see a new project on the blog soon!

Any boxes can help you sort your fabric out, the important bit is to fold the pieces and store them with a folded edge showing so you don’t have to dig through a stack of fabric which usually results in the whole lot not fitting into the box anymore!

Now to go through my paper stash and arrange it into colour order…. seriously!

Kitty x
Early Years Craft: Holly Wreath

Standard

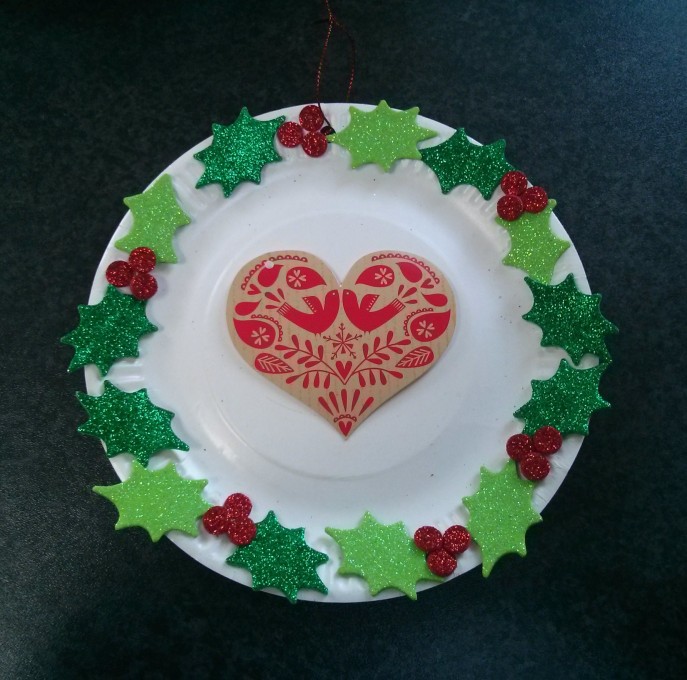
EYS Holly Wreath

This week I wanted to come up with a very simple Holly Wreath craft for the Mums and Tots group that I co-run. This idea is exactly that, easy, and I actually ran out of materials on the morning because it was so popular.

You will need:

Small paper plates – mine were 80p for 25 from Sainsbury’s
Gift tags – I found this heart shaped tag, plus a selection of circular tags for £1 reduced to 66p for 8 at Sainsbury’s but other tags would work, you could also print out a design and cut it out.
Holly & Berry Glitter Foam Stickers – These are brilliant, I ordered three packs for £8.55 from Baker Ross which made around 25 plates, but if you making this for home you could just order one pack for £2.99.
Sticky foam pads – You could also use glue or double sided sticky tape.
Hole punch

Instructions

  1. Punch a hole in the edge of the paper plate.
  2. Untie the string or ribbon from your gift tag and tie this through the hole in the edge of the plate instead. You could use your own thread or ribbon if you prefer.
  3. Remove a sticky pad from the sheet and stick it onto the back of the gift tag. Peel off the second paper layer from the sticky pad and stick the tag in the centre of the paper plate.
  4. Using the holly and berry stickers create a design around the edge of the plate. The stickers have a paper backing which needs to be discarded but they have very good adhesive. Even the younger tots were able to peel them, I was very impressed with the quality.
  5. You’re done. It really is that simple and yet can look amazing.

I did skimp a bit on the leaves with the example above as it was made to show the children what to do and I didn’t want to use up too many resources! Some of the designs the children came up with were stunning, from the abstract to the almost obsessively precise.

You could put berries in a circle around the tag, you could lie the leaves so that they are in a sunburst pattern. The lovely thing about this craft has been that with so few resources and for such a young age range you can get some lovely results that you’d be proud to hang on your wall or your tree!

Decoupage for the 21st Century

Image
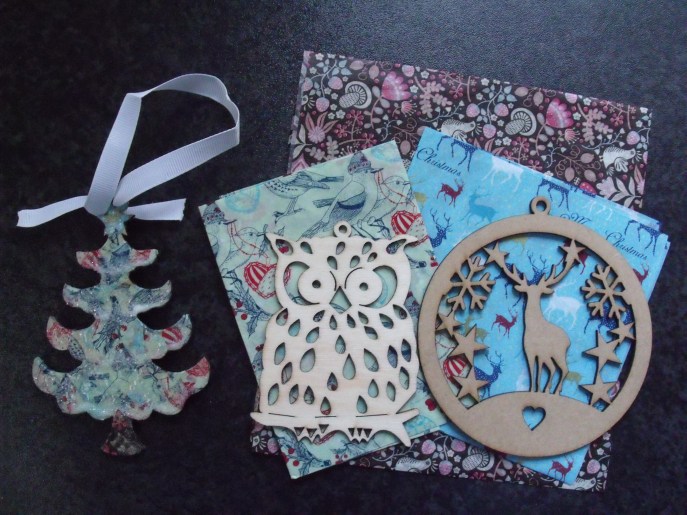
Decoupage Kits

Decoupage Kits

Today I had an unexpected hour of free time and I thought I would have a go at decoupage. This craft is suspiciously like expensive papier mache and nothing like the decoupage I remember where you basically have lots of copies of a picture, then you cut out smaller sections and layer them with little sticky pads in between to make a 3D picture.

This month I have picked up two craft magazines which both had a Decoupage kit on the front. The first magazine was Homemaker Magazine, this had a lovely double decoupage kit with two wooden cutouts, one was a tree, the other a stag. The second magazine was Crafts Beautiful, this has a lovely set of felt woodland creatures and a decoupage owl as a free kit. As a bonus, I bought my copy in Tesco which had a free book with it as well!

For my first attempt I chose the tree shape from Homemaker as it was the least fiddly. I found some old PVA glue and I combined the papers from both kits to go for a traditional brown trunk, green leaves and a golden star. The Homemaker kit had a wide brush included so I was good to go.

How to Decoupage:

  1. Clean an area of table and place down a large, wipe-able mat.
  2. Pour some PVA glue into a pot, the lid from an aerosol can or similar is ideal. If it is very thick, you may want to thin it a little with a very small amount of water
  3. Decide which papers you are going to use, cut them into small squares and triangles if, like me, you are going for a papier mache look. If you wish to have a whole sheet image, you will need to use a slightly different approach to that described below, and make sure you have a long craft knife to cut each hole.
  4. Think about which areas will need to overlap if you wish to use more than one paper, for example in the tree, I wanted to have a tree trunk, and ensure that the green boughs would be over the brown paper. The first layer in this case is the brown paper.
  5. Paste a layer of PVA across the whole of the first side of the shape, placing it on the mat you prepared earlier. Then add a second layer beneath each piece of decoupage paper that you are going to lay down.
  6. Using the same brush, paste more PVA carefully on top of each piece of paper, using the brush to press down and smooth out any wrinkles. Gently press any pieces which overlap the edge around to the other side.
  7. You may need to use a craft knife to make a small cut to help you paste around a tricky edge and you can use a small rounded tool, for example the end of a pen or a knitting needle to push through and smooth around small holes, for example eyes.
  8. Keep applying pieces of decoupage paper until the shape is completely covered, paste over one more thin layer of PVA over the shape and leave to dry.
  9. When it has dried clear you can add a second layer of papers if you wish, or fill in any gaps that you have missed. If you wish to paper the other side of the shape you will need to repeat the process above.
  10. When you are happy with your decoupage you can add finishing touches. This kit came with a bag of glitter. To apply this, paste PVA on the areas you would like to add glitter to. Place the shape on a piece of paper and shake the glitter over the whole shape. Tip the shape onto it’s side and bang gently to remove excess glitter. You can repeat the process by placing the shape on a second piece of paper and pouring the excess glitter back over the shape. Leave to dry until PVA is clear.
  11. When completely dried stand back and admire your work. This kit came with a piece of ribbon to thread through the top of the shape, this was just threaded through the hole at the top and tied off.

The Results

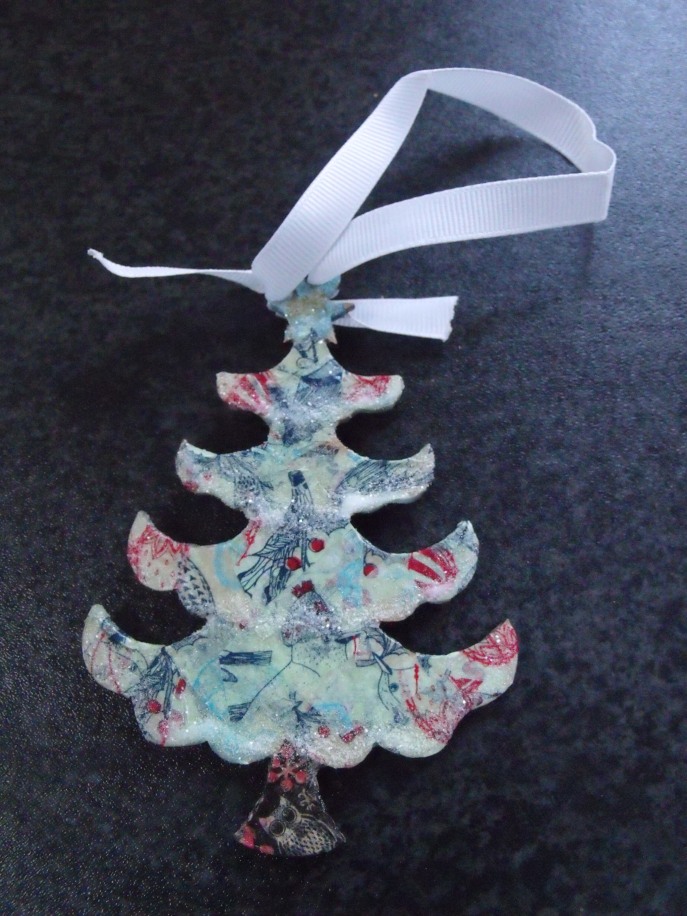
Finished Decoupage

Finished!

I am happy with the end result but I should have prepared my materials first. The PVA I used was too thick and the paper wrinkled very easily. I cut squares of paper as I went along which lead to the glue drying slightly between layers. I also think cutting triangles may have made it easier to press around the edges and into corners, I found myself pressing around the edges with my fingers as it dried.

The glitter was a nice touch, though very pale, I may try using other embellishments on my next project. It was a nice way to spend the afternoon and I’ll definitely try it again.

Scrabble

Standard

I am in no way affiliated with the board game Scrabble made by and trademarked by Mattel/Hasbro. Any views expressed in this blog are in no way representative of the views held by Mattel/Hasbro and are entirely my own.

I personally think Scrabble is a brilliant game, I remember playing it on holidays as a child, playing it on my ZX Spectrum + and I still play the Junior version with my Aspie daughter who absolutely loves board games.

I have no special insight into hints and tips for Scrabble so if that’s what you’re after, you’ve come to the wrong blog!

Kitty x

What’s with the name?

Standard

So, you may be wondering why I chose the title of my blog, or you may not, but I’m going to explain anyway.

I am a stay at home mum with three children, a husband and a mother-in-law under the same roof. A couple of years ago I was diagnosed with ADHD, this causes me to start projects that I never finish (hopefully this isn’t another one), forget to do things that most people would do as a matter of habit, stay up late, wake up late, lose things, generally be a bit useless. I take medication which helps but doesn’t fix the problems.

Now ADHD in itself is too bad for Scrabble but, I’m not the only one in the house with it. My eldest is 11 and she also has ADHD. My middle daughter is 9 and she has Asperger’s Syndrome, I could cheat and call it AS which gives a couple more letters, and then my youngest, my son who is 4, has ASD, autism to most people and a Chromosome Disorder. If Scrabble has numbers that would be handy because he has a microdeletion at 2q12.3-13. That would confuse the game.

My husband is Dyslexic which doesn’t lend letters to the game but makes it much harder for him to make a decent word out of the letters, and my mother-in-law. Well, not officially diagnosed with anything but that’s another story.

So that’s my life, trying to get through each day whilst avoiding meltdowns, avoiding repeat trips to schools to take forgotten books, pencil cases etc, getting the right food to the right people, and generally existing.

In my blog I’m hoping to be able to offer some helpful reviews, run a competition or too, and also share my latest wins as I love a good competition myself, and hopefully the blog will unfold itself as I go along!

Thanks for stopping by,

Kitty x